Thursday, November 15, 2012

How I budget my makeup spending

So, I know I'm not a professional budgeter or whatever (that's not even a word) but, you know, I think I'm pretty good at managing my money now-a-days. And I know there are other college girls out there who probably have the same problems I do when it comes to shopping for various things. I basically use the same system for everything I buy now: Makeup, Clothes, Hair products, Food. And it seems to work well. So I thought I would break it down for you and then show you what makeup I end up buying using this system. Let's give this thing a name though shall we? How about... The "Cent or Dollar?" method. I like it!

Okay so here are the steps:
  1. Figure out what is most important to you in each category of things you buy
  2. Figure out how much you want to spend on each product, each month, or each time you go shopping
  3. Don't forget that you can splurge every once in a while. My rule is if you've been wanting it for longer than a month or two, then its okay to buy it. But at the same time, it's not an excuse to empty out your bank account!
  4. Never underestimate old items you have or using one product for multiple things.
In the makeup realm, the two important products to me are foundation/concealers and mascara. I have Rosacea (self-diagnosed lol) so I am definitely looking for the best foundation and concealers I can afford to cover up that red mess on my face.

I've had this BB Cream since the summer and I really love it! I spent $13 on it, which may not be a lot for some people, but it's all about knowing your limits. I still have about 2/3 of it left too! Good purchase.
I am also always looking for a good mascara because my lashes suck. They are small and there are not a lot of them.

I use these two mascaras. The orange tube is Covergirl Lashblast Volume in brown. I use that on the weekdays when I'm really only just going to class. The purple is Falsies Volume Express and I absolutely love that one. I wear that when I go out and what not.  I can't remember how much I paid for these but I bet they were between $5-$7.
Everything else I can basically cheap out on more.

From top to bottom:
The top is actually this purple cream eyeshadow that is super old and I found in my room at home a few months ago. I use that in the dark spots around my eyes to brighten them.
The second is Wet 'n Wild Mega Glo which I use kinda as a highlighter. It just brightens up your face. That was $2.
The third tube is my green concealer, which I use a whole lot to cover up the red on my face when it's at its worst. It's by Physician's Formula and was about $12 I think (pricey I know but totally worth it).
Lastly, a pressed powder also by Wet 'n Wild that was around $2.


Another brand I like is e.l.f. This is their eyelash curler. I really feel like most eyelash curlers are the same and this was the cheapest one I could find. Only $1!
These are the two blushes I have. The top is called "Iced Plum" by Covergirl. That was probably around $6. Which is more than I would spend on a blush now, but I bought it like a year ago and haven't even made a dent in it. The bottom blush is called Color Confetti by Avon. I have had this blush since like middle school and I usually mix these two together in spring and fall, wear the top in the winter and the bottom in the summer.
My favorite cheap item I can buy a lot of are lipsticks. Specifically the Wet 'n Wild kind. No joke people, the $2 you pay goes a long way.

None of the Wet 'n Wild lipsticks have names for some reason. And the red in the top left actually came with some fake eyelashes I bought for Halloween senior year of High school. and the top peachy color was actually one I just found in my house a few years ago and never liked on me until now. 
Another tip I will say along with this is that I am a firm believer in how you apply it is more useful than how much the product is. And that's why I urge everyone to buy some makeup brushes.

I have makeup brushes that I bought from Walmart and from e.l.f.'s website. They were both $10 per kit. The container they are in is just an old ceramic container I got as a gift in middle school that I painted and decorated.
 Also, something I've discovered recently... Halloween makeup!

I use this palate as a base for my eyeshadows. They last so much longer with a base color and the eyeshadows just pop. You just can't use a lot because the makeup is pretty oily. A little bit goes a long way with this one.

Last thing, You can save some money and get a lot of perfumes. Victoria's Secret offers a box of these little tester sized perfumes for around $20. Seven come in the box (I lost one when I went to Georgia over the summer) and they last a really long time. I've had these since Christmas last year.
If you prioritize your life and your spending, you're more likely to love the things you buy and not have any of that "after-shopping regret" us girls usually get. I hope this works for you! Stay tuned for some easy made Thanksgiving cookies I'll try to post before Thanksgiving! Bye Bye Bye!

Wednesday, October 24, 2012

DIY Skeleton Shirt!

Hey ya'll! So just in time for the festive season, a tutorial on a Halloween t-shirt! It's is so easy to do all you need is a plain black t-shirt and some scissors! So let's get crack-a-lackin'!
Here's your start. Just a plain t-shirt. I cut off the collar because I hate feeling like I'm being strangled in a shirt! Suffocation much? Yeesh. Also, I should say that you should put the shirt on before cutting it and measure where you want the face to start. And I'm cutting this on the back on my shirt by the way, not the front, but you can do whatever you want!

First cut some eye holes. They don't need to perfect because... well they just really don't need to. Doesn't make or kill the shirt regardless. (Side note, I put a piece of plain fabric between so you can see the cuts more clearly. I didn't cut on both sides).

Next, two small holes for the nose. Or lack of a nose I guess.

Last, cut two rows of "teeth". Just lines of small holes in the shirt.

Here's the front which i will wear jewelry so its not so boring.
And here's the back! (Look it how awkwardly I had to take this picture. I was the only one home so I couldn't have anyone else take it haha)

And that's it! Hope you guys have a great Halloween weekend and day! Eat all the candy you want. It's the only day you can get away with it without feeling guilty! For now, Bye Bye Bye! :)

Monday, September 24, 2012

My top knot/bun tutorial

So people have been asking me how I do my top knot lately. And by people, I mean like 3 people. But I've realized that the sock bun tutorial doesn't work for many people, including myself, and this is a way I've come up with that works for my hair. So hopefully it works for you! Find out for yourself!

1. Start with your hair straight
2. Then put your hair up into a tight (not to tight) ponytail on top of your head (like Sporty Spice!)
3. Then take another hairtie, smash your hair down so you look like a crazy person
4. Here's a close-up of what it looks like from the top
5. And again from the front
6. Then pull the bun out piece by piece to make the bun bigger. Bobby pin the loose strands down and wah-lah!


The finished product! So easy to do. Especially when you're running late for class. Hope it works for you! Bye Bye Bye! :)

Thursday, August 30, 2012

What I snagged from my Nana!

Hey there Spanish Galleons! So before I left for school, I went to visit my Nana and Papa. We were looking in the basement for stuff I could use in the apartment (snagged a vanity mirror!) and we stumbled upon a closet full of clothes. Which all three of us (my sisters and I ) were excited about! The first thing that caught my eye the second my sister Jen opened the closet: This striped shirt. Immediately, I called dibs. They were not happy about that because... well... It was the best shirt out of the bunch! 

Here's an outfit I put together with this. I just had a simple silver bangle on my wrist, sleeves rolled, black leggings and some small, silver dove/heart earrings. P.S. Look how messy my room was! :o
 Second thing I snagged was this sheer pink short sleeved button up. Another great one! (And another thing they weren't happy about me having).

I wore this shirt with short jean shorts, and matching light blue and yellow earrings and bracelet. (the bracelet is actually a necklace that I just wrapped around my wrist). 

Moral of the story is you find great clothes in the strangest places! These are probably my two favorite things in my closet at the moment and they were my Nana's! So go home and raid your grandmothers' closets! Or any old person... well don't rob them but you get what I'm saying. Okay, bye bye for now!

Wednesday, August 29, 2012

Where have I been?!

Well it has been a while since I've been on here! That's pretty bad. I've just been really busy. I know, that's everyone's excuse but I'm serious! I'll give you a little bit of a recap of what has been going on since my last post.

Well first of all, the day after my last post, I went to North Dakota with my boyfriend, Chris. Which was a lot of fun! Especially cause I don't travel. I like to, but I can't. No dinero (that means $$$) if you get what I'm saying. So it was nice to take a trip somewhere. We took the train... it took us like 16 hours to get there. Holy crap, right?! But it was a lot of fun.

The UND quad (where Chris goes to school)

After that I just worked a TON! Gotta make that money to pay my rent and the millions of dollars I'll have to pay back in student loans!

Don't I just look fantastic in my uniform??? ;)

Then in July my cousins came in and we were doing a bunch of stuff that whole week; went to the Sox game, celebrated the 4th (it's my sister's birthday that day) and went shopping downtown. Fun as always! They only come twice a year so we do a lot of stuff while they're here.

At the White Sox game! Being so typically goofy.

Then a few of my friends and I went up to Michigan to my friends lake house for the weekend, went on their boat and partied!

Ready to jump in the cold water with my best friend Val! :)

Then for a few days I was lucky enough to go to Georgia with Chris and his parents to visit his grandparents! So much fun. I got to go tubing and jet skiing for the first time! And that was a state I've never been to and my third time on a plane! Their house was gorgeous. Like you don't even know. Well I guess you will in a second 'cause I'm gonna put a picture up!

BAM! How do you like them apples?! They're unfortunately selling the house and moving elsewhere. I told Chris we need to buy this house. I don't think he knows I was being serious...
But the whole trip was amazing. Driving a boat is like a mode of transportation down there which I thought was so awesome. Who doesn't wanna drive a boat to dinner? If you said you don't, then you're crazy.

Me and Chris on the jet ski! I didn't drive. I was way too nervous.


Then we took a mini vacation as a family to Michigan for the day and went to the beach and walked around in all the little shops there.

A picture of my sisters sitting and admiring the lighthouse.
And last but not least, THE COLDPLAY CONCERT! Literally, so awesome. We got these wristbands that light up with the music and it looked super awesome. Take a look!

Crazy right?! That was one of the coolest experiences of my life. As some of you already know, concerts are like my favorite thing in the world to do. This is definitely top 2 (if not #1. Paramore is very hard to compete with)
Also I did my nails pretty cool for the concert, so if you guys want a tutorial of this let me know! Here's what they looked like!

My hand looks like the claw from Liar Lair in this picture. NO ONE CAN STOP THE CLAW!!!
Alrighty! I've rambled enough! But last thing. I'm in my apartment now and everything is great! I'm two weeks into school and loving my classes (I'm taking photography and apparel design at the same time!) But that's all for now. Stay tuned for tomorrow when I upload some outfits of stuff I scored from my Nana's closet! Bye Bye Bye!

Wednesday, June 6, 2012

New Products and Such

So, I've been super busy all day so I had to come up with something for "Whatever I Want Wednesday" real quick. The first thing I thought of was telling you about some new products I have been trying and what I think about them. So here we go!

Clear Shampoo and Conditioner: Just bought this a few days ago. I haven't tried the shampoo yet but the conditioner made my hair feel a lot better. My hair has been super damaged lately and the whole "tree" thing this product talks about in the commercial (you know, the one with Heidi Klum).

Age Rewind Foundation: Saw this on Elle Fowler's vlog on youtube and wanted to try it since I'm a self diagnosed Rosacea sufferer (I swear I have it). It covers pretty well but I can still see red at the end of the day or after work. Anyone have any ideas of what I should get?

John Freida repair shampoo: Like it a whole lot. I used it once and loved it! Plus, it smells really good!

Sorry this one was kind of lame! I'm leaving for North Dakota tomorrow and I'm completely unprepared. Yikes! Talk to you all soon! Bye Bye Bye!

Tuesday, June 5, 2012

Beauty Tutorial Tuesday: 3 Ways to Style Your Hair with a Straightener

Hola! So, for my first Beauty Tutorial Tuesday I'm going to be showing you all how to style your hair 3 different ways just by using your straightener. Crazy, right?! It saves you a crap load of money because you only need one tool to do it all! So let's begin, shall we?
For all of these styles, I'm using my straightener that's about 1 inch wide that I got from Target. I also sprayed my hair with my John Freida heat protector and a style hold spray also from John Freida. The hairspray I use is from Aussie.
 
The first style is just a variation on straightening it that kind of switches things up from your normal straightened hair. Separate your hair into three sections: From you ear down, From your ear to your temples and the top part (aka the rest of your hair). Straighten the bottom two sections and flip the ends in like you normally would. Make sure your are combing or brushing your hair before you straighten each strand to make sure there are no tangles! Tie the sections back with a hair tie loosely so it's out of the way but with no kinks. In the top section, flip your bangs (or hair that falls infront of your ears) out. Same with the hair on the opposite side. Flip the rest of the top section in, untie the rest of your hair, comb/brush one last time and hairspray!
Here's the finished product!
Next style is a wavy style. This time, section your hair into two sections: From the temples down and the temples up. Take your first strand about 1-2 inches wide and hold the straightener curving the the straightener up and over. Hold for a few seconds and then reposition the straightener at the bottom of where the kink is and curve the straightener down and out. Hold and continue down the rest of the strand until the bottom and do that for each strand. Tie the bottom part back and do the same for the top part. Spray with hairspray and tousle your hair like you were scrunching it to make it a little more wild and messy looking.
Finished product!

The third and final look is soft curls (started with the separation into 3 like the straightened hairstyle). Start by holding the straightener upright and twirl the bottom of a 1-2 inch wide strand away from your face. Hold for a few sections (less than you would think you would have to). Then reposition the strand further up the strand but overlapping a tiny bit with the last curl. Twirl the same way you did the last and hold. Do the same for the rest of the strand and the rest of your hair. Be sure to twirl the straightener away from your face on both sides! When you're done curling, grab a wide-toothed comb (or just use your fingers) to comb out your hair. Only do it a few times or else your hair might get puffy! Hairspray and you're done!
Finished look!
 That's all for now! Try these out and let me know how it went! Bye Bye Bye!


Monday, June 4, 2012

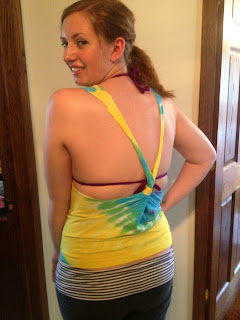
Look What I Made Monday - Razor Back Tank top

Hey y'all! Day one of me trying to better with all of this blogging stuff! Today on our first "Look What I Made Monday," I'm going to show you how to make a razor back tank top or bathing suit coverup out of an old t-shirt. Let's do this!
Alright, First thing you need to do is find an old t-shirt you don't really wear. All you need for this is a shirt and scissors. I honestly have no idea where this shirt came from, why we have it, whose shirt it is and why Melissa had a winter wonderland, but I'm cutting it up anyway!

Start off by cutting off the sleeves. You wanna cut it a little lower than where the bottom seam of the sleeve and the rest of the shirt meet. Do something I didn't do and put it on and make notes of how low you want to cut everything before you start to make it easier on yourself. Another tip is to make sure you make the front wide enough when you cut. You want your boobs to be covered after all, right? (Unless you don't then... well... cut away!)

Next, cut off the collar of the shirt and then some in the front. I stopped mine right at the start of where the graphic begins on the shirt.

Flip it over and cut about 2-3 inches further in the back than the front so you have room to tie it in the right spot.

Flip the shirt inside-out and find a scrap from the rest of the shirt that's long enough to tie it around the back. Tie the piece at the farthest point down the straps you can to make the back more... back-less. Make sure you double-knot it and cut off any excess you don't need from the tie. If you want you can also use a ribbon at this point and tie it into a bow on the outside! Whatever you wanna do!

Turn the shirt back right side out and wah-lah! (I don't know if that's how you spell that. You get the point).


Hope you enjoyed this one! Leave comments below if you'd like and tell me some ideas you'd like to see for next Monday! Bye Bye Bye!

Wednesday, May 30, 2012

Update numero dos!

Okay people. I know. I've been slacking. But I've been super busy with moving out and moving back home and going back to work and getting my wisdom teeth out that I haven't found the time and money to do all this. But I'm gonna try and come back on Monday once I'm healed from this "surgery." Anyway, I think I've figured out how I'm finally going to do all of this. Here's what I'm thinking for the weekly line-up:

Monday - "Look What I Made Monday" - I make something crafty.
Tuesday - "Beauty Tutorial Tuesday" - I show you either a makeup or hair tutorial.
Wednesday - "Whatever I Freaking Want Wednesday" - Free day for something that doesn't fit in the category.
Thursday - "Thrifty Thursday" - I show you a secret trick or product that I like that's cheap.
Friday - "Fashion Faux Pas Friday" - You get to hear me rant about something trending or something that I have seen that I hate.

These may or may not end up changing but I am a fan of these! I'm going to try to post more things for those of you who read this. Or stumble upon it one day. Or follow me on pinterest, twitter or are facebook friends with me. That's all I have to say! If you want to see anything in particular for me to do, let me know! Bye Bye Bye!

Kate

Tuesday, April 24, 2012

So just an update for everyone! First off, I shot a video of the stuff I got from Spree finally. Only issue is I have no idea how to upload it. So, once I figure it out, it'll be up and ready to go! Secondly, (is that even a word???), I am going to TRY (we'll see if i actually do it) to start uploading stuff everyday day Mon-Fri with a different theme. I'm in the works so far with what each day will be but I know Mondays will probably "Man, look what I made! Monday" and Fridays will be "Fashion Faux Pau Friday" ... I have no idea if I spelled that right. But you get the picture. One of the other things I wanna do is the a Challenge day. That'll be like someone tells me to do something and I try and do it. You know. Like a challenge. Hahahaha. But the first few I do are gonna be the challenges from Beauty Blogger Boot Camp with Elle and Blair Fowler. You should watch it! Some people hate it but I like it! It's on youtube. But each week the contestants have a challenge so I'm gonna do them. I think that'll be on Tuesday's. And I'll call it... "Challenge Accepted! Tuesday." I like that. Get some How I Met Your Mother going in that one. I'm not sure what to do on Wednesday or Thursday so if anyone has any ideas let me know! That's all for now! Bye bye bye!

Tuesday, April 17, 2012

Nautical Nails

Hey Hey Hey! SO I saw these nails on Pinterest and thought I'd give it a go and see if I could recreate this with what I have in my room. It worked so I'm gonna teach y'all how to get some nautical type nails like these!
based off of nails by lifeinthepreppylane.
  1. Start off with your basic base coat to protect those nails! I use my base coat from Ulta.
  2. Now that your nails look exactly the same, it's time to move on the the next step
  3. Find a white nail polish, preferably not the one that I have from the third grade that's a weird consistency.
  4. Apply two coats to each nail
  5. This is the most difficult part but it's not that bad. Get a piece of Scotch tape and cut it into skinny strands. (The make strands different widths. The smaller the nail, the skinnier the tape should be.
  6. In possibly the most awkward looking way, place the tape in vertical stripes making sure to leave some space between each piece.
  7. Next, pick a shade of blue or blue/green. I didn't have the exact color I wanted but this nail polish I got from Forever 21 will do.
  8. Put two coats on each nail of that nail polish. 
  9. Pull the tape off as soon as you are done painting over each nail. the more dry it gets, the more holes you'll have to fill in from where the tape took off nail polish.
  10. After touching up your nails, grab either a black nail pen or black nail polish and a tooth pick (that's what I used to use before I got this pen from Charlotte Russe). 
  11. Draw (to the best of your ability) an anchor on one of your big toes.
  12. You can do any design you want on a different toe. I did a compass on my "ring toe".
  13. Finish it all off with a top coat (mine's from Sally Hansen).


Tah Dah! The finishing product!
Alright! So, try this out! You'll feel like an artist! More posts to come! Bye Bye Bye!

Tuesday, March 27, 2012

What to do with some shirts you hate!

Hey Hey Hey! Sorry I've been gone for so long. I've had so much to do and I'm finally catching up with everything now since Spring Break and all. I'm going through some layout changes on my page too. I also have 3 posts for this week probably... My thrift store haul will be later this week cause I also wanna talk about my new hat. But my roommate forgot my hat in her friend's car. So, hopefully that comes soon since I said I was going to do that. BUT I did do two DIY tutorials! Yippy! I was bored/procrastinating cleaning my room (like I am right now, yikes!) so what I did was a scarf out of an old crappy shirt and a cropped shirt out of this stupid tank top. Let's do this! (also sorry for the crappy quality photos. I had to take them with my phone)

Tank Top to Cropped Top
  1. Get a crappy shirt. The shirt I'm using is from Target and I absolutely hate it. I don't know why. I was gonna throw it out but then I found a tutorial on Pinterest and thought, why not?! I don't know who the original tutorial is from cause I couldn't find the link.
  2. Cut a slit straight down the middle in the front of the shirt. (I didn't measure, but I highly suggest you put on the shirt and make markings for steps 2-4)
  3. Put the shirt on and measure where your waist hits. Mark those spots on the sides. Take the shirt off and cut straight along both seams on the sides to the spot you marked.
  4. Here's the tricky part. Cut a diagonal from the bottom corner (where the middle slit is) to the end of the side slit. Do this on both sides to make two triangle shapes in the front. Then flip the shirt over and cut straight across between the two sides.
  5. Flip the shirt back over and tie the two triangle pieces in a bow (Double knotted!)
 There you go! Now you've got a cute cropped shirt you can wear with a high-waisted skirt, as a bathing suit coverup, or if you're super gutsy, with shorts! Cute, right?


T-shirt to Scarf


  1. Omg. I hate this shirt. I used to love it and then it shrunk! I was pissed. This is from Forever 21. The tutorial of this I got off of was "P.S. I Made This."
  2. Okay, so first thing you do is cut horizontally across the shirt. The more fabric you cut off, the more fabric will be in your scarf. Also, I don't show this, but I did this later in the process cause I thought it would look better: Cut the bottom hem off your shirt. It'll make the strands thinner.
  3. Cut vertical, small strips along the entire bottom of the fabric all the way around. the longer and thinner, the more strands.
  4. Pull the strands too make them longer.
  5. You can double it like I did here, or just leave it as is and wear it!
Awesome! A cute summer scarf for free!

Now, you might be thinking the same way as me and think "hmm... I wonder if I can use the rest of the shirt for something else!"
Exhibit A
  I put it on and...well... I suggest not wearing that...Unless you plan on looking like Ciara in the "Goodies" video...

Exhibit B (Courtesy of blingcheese.com) (bling cheese?! I won't ask)