Monday, June 4, 2012

Look What I Made Monday - Razor Back Tank top

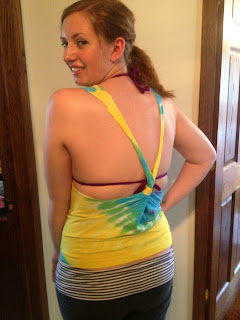
Hey y'all! Day one of me trying to better with all of this blogging stuff! Today on our first "Look What I Made Monday," I'm going to show you how to make a razor back tank top or bathing suit coverup out of an old t-shirt. Let's do this!
Alright, First thing you need to do is find an old t-shirt you don't really wear. All you need for this is a shirt and scissors. I honestly have no idea where this shirt came from, why we have it, whose shirt it is and why Melissa had a winter wonderland, but I'm cutting it up anyway!

Start off by cutting off the sleeves. You wanna cut it a little lower than where the bottom seam of the sleeve and the rest of the shirt meet. Do something I didn't do and put it on and make notes of how low you want to cut everything before you start to make it easier on yourself. Another tip is to make sure you make the front wide enough when you cut. You want your boobs to be covered after all, right? (Unless you don't then... well... cut away!)

Next, cut off the collar of the shirt and then some in the front. I stopped mine right at the start of where the graphic begins on the shirt.

Flip it over and cut about 2-3 inches further in the back than the front so you have room to tie it in the right spot.

Flip the shirt inside-out and find a scrap from the rest of the shirt that's long enough to tie it around the back. Tie the piece at the farthest point down the straps you can to make the back more... back-less. Make sure you double-knot it and cut off any excess you don't need from the tie. If you want you can also use a ribbon at this point and tie it into a bow on the outside! Whatever you wanna do!

Turn the shirt back right side out and wah-lah! (I don't know if that's how you spell that. You get the point).


Hope you enjoyed this one! Leave comments below if you'd like and tell me some ideas you'd like to see for next Monday! Bye Bye Bye!

Wednesday, May 30, 2012

Update numero dos!

Okay people. I know. I've been slacking. But I've been super busy with moving out and moving back home and going back to work and getting my wisdom teeth out that I haven't found the time and money to do all this. But I'm gonna try and come back on Monday once I'm healed from this "surgery." Anyway, I think I've figured out how I'm finally going to do all of this. Here's what I'm thinking for the weekly line-up:

Monday - "Look What I Made Monday" - I make something crafty.
Tuesday - "Beauty Tutorial Tuesday" - I show you either a makeup or hair tutorial.
Wednesday - "Whatever I Freaking Want Wednesday" - Free day for something that doesn't fit in the category.
Thursday - "Thrifty Thursday" - I show you a secret trick or product that I like that's cheap.
Friday - "Fashion Faux Pas Friday" - You get to hear me rant about something trending or something that I have seen that I hate.

These may or may not end up changing but I am a fan of these! I'm going to try to post more things for those of you who read this. Or stumble upon it one day. Or follow me on pinterest, twitter or are facebook friends with me. That's all I have to say! If you want to see anything in particular for me to do, let me know! Bye Bye Bye!

Kate

Tuesday, April 24, 2012

So just an update for everyone! First off, I shot a video of the stuff I got from Spree finally. Only issue is I have no idea how to upload it. So, once I figure it out, it'll be up and ready to go! Secondly, (is that even a word???), I am going to TRY (we'll see if i actually do it) to start uploading stuff everyday day Mon-Fri with a different theme. I'm in the works so far with what each day will be but I know Mondays will probably "Man, look what I made! Monday" and Fridays will be "Fashion Faux Pau Friday" ... I have no idea if I spelled that right. But you get the picture. One of the other things I wanna do is the a Challenge day. That'll be like someone tells me to do something and I try and do it. You know. Like a challenge. Hahahaha. But the first few I do are gonna be the challenges from Beauty Blogger Boot Camp with Elle and Blair Fowler. You should watch it! Some people hate it but I like it! It's on youtube. But each week the contestants have a challenge so I'm gonna do them. I think that'll be on Tuesday's. And I'll call it... "Challenge Accepted! Tuesday." I like that. Get some How I Met Your Mother going in that one. I'm not sure what to do on Wednesday or Thursday so if anyone has any ideas let me know! That's all for now! Bye bye bye!

Tuesday, April 17, 2012

Nautical Nails

Hey Hey Hey! SO I saw these nails on Pinterest and thought I'd give it a go and see if I could recreate this with what I have in my room. It worked so I'm gonna teach y'all how to get some nautical type nails like these!
based off of nails by lifeinthepreppylane.
  1. Start off with your basic base coat to protect those nails! I use my base coat from Ulta.
  2. Now that your nails look exactly the same, it's time to move on the the next step
  3. Find a white nail polish, preferably not the one that I have from the third grade that's a weird consistency.
  4. Apply two coats to each nail
  5. This is the most difficult part but it's not that bad. Get a piece of Scotch tape and cut it into skinny strands. (The make strands different widths. The smaller the nail, the skinnier the tape should be.
  6. In possibly the most awkward looking way, place the tape in vertical stripes making sure to leave some space between each piece.
  7. Next, pick a shade of blue or blue/green. I didn't have the exact color I wanted but this nail polish I got from Forever 21 will do.
  8. Put two coats on each nail of that nail polish. 
  9. Pull the tape off as soon as you are done painting over each nail. the more dry it gets, the more holes you'll have to fill in from where the tape took off nail polish.
  10. After touching up your nails, grab either a black nail pen or black nail polish and a tooth pick (that's what I used to use before I got this pen from Charlotte Russe). 
  11. Draw (to the best of your ability) an anchor on one of your big toes.
  12. You can do any design you want on a different toe. I did a compass on my "ring toe".
  13. Finish it all off with a top coat (mine's from Sally Hansen).


Tah Dah! The finishing product!
Alright! So, try this out! You'll feel like an artist! More posts to come! Bye Bye Bye!

Tuesday, March 27, 2012

What to do with some shirts you hate!

Hey Hey Hey! Sorry I've been gone for so long. I've had so much to do and I'm finally catching up with everything now since Spring Break and all. I'm going through some layout changes on my page too. I also have 3 posts for this week probably... My thrift store haul will be later this week cause I also wanna talk about my new hat. But my roommate forgot my hat in her friend's car. So, hopefully that comes soon since I said I was going to do that. BUT I did do two DIY tutorials! Yippy! I was bored/procrastinating cleaning my room (like I am right now, yikes!) so what I did was a scarf out of an old crappy shirt and a cropped shirt out of this stupid tank top. Let's do this! (also sorry for the crappy quality photos. I had to take them with my phone)

Tank Top to Cropped Top
  1. Get a crappy shirt. The shirt I'm using is from Target and I absolutely hate it. I don't know why. I was gonna throw it out but then I found a tutorial on Pinterest and thought, why not?! I don't know who the original tutorial is from cause I couldn't find the link.
  2. Cut a slit straight down the middle in the front of the shirt. (I didn't measure, but I highly suggest you put on the shirt and make markings for steps 2-4)
  3. Put the shirt on and measure where your waist hits. Mark those spots on the sides. Take the shirt off and cut straight along both seams on the sides to the spot you marked.
  4. Here's the tricky part. Cut a diagonal from the bottom corner (where the middle slit is) to the end of the side slit. Do this on both sides to make two triangle shapes in the front. Then flip the shirt over and cut straight across between the two sides.
  5. Flip the shirt back over and tie the two triangle pieces in a bow (Double knotted!)
 There you go! Now you've got a cute cropped shirt you can wear with a high-waisted skirt, as a bathing suit coverup, or if you're super gutsy, with shorts! Cute, right?


T-shirt to Scarf


  1. Omg. I hate this shirt. I used to love it and then it shrunk! I was pissed. This is from Forever 21. The tutorial of this I got off of was "P.S. I Made This."
  2. Okay, so first thing you do is cut horizontally across the shirt. The more fabric you cut off, the more fabric will be in your scarf. Also, I don't show this, but I did this later in the process cause I thought it would look better: Cut the bottom hem off your shirt. It'll make the strands thinner.
  3. Cut vertical, small strips along the entire bottom of the fabric all the way around. the longer and thinner, the more strands.
  4. Pull the strands too make them longer.
  5. You can double it like I did here, or just leave it as is and wear it!
Awesome! A cute summer scarf for free!

Now, you might be thinking the same way as me and think "hmm... I wonder if I can use the rest of the shirt for something else!"
Exhibit A
  I put it on and...well... I suggest not wearing that...Unless you plan on looking like Ciara in the "Goodies" video...

Exhibit B (Courtesy of blingcheese.com) (bling cheese?! I won't ask)

Thursday, March 8, 2012

OOLW? (outfit of last weekend)

Hey Ho! I wore this the other day and I really liked it. So, I thought, why not put it on here! And, yes, I did take a 7th grade myspace photo, but I was in a hurry! And my camera died right after I took this... weird. Anyway, spring break is coming up and I'll be spending it in the lovely Tinley Park! (I hope you catch my sarcasm). But me and my two sisters will be going thrift shopping so I should be able to post a lot more stuff after that (and of course after I steal some batteries from my house for my camera). Anywho, here's the outfit! Enjoy!

Alrighty! The top is from PacSun, which my cousin Danielle picked out for me. The skirt is from Wet Seal (Which I'm now wondering if it still exists in our mall...). The boots are from Charlotte Russe (which is no longer in our mall) (I lost the boots senior year of high school and recently found them in my garage closet! Yay!). The necklace was a gift from my friend Em, so I have no clue wear its from.

Monday, February 27, 2012

Men's Fashion (or lack there of...)

So. This is for all you men out there. But girls, I guarantee you'll be reading this and be like, "Yeah! What's their deal?!" Guys these days (atleast the one's around my age) do not dress right. Not all of them look bad, but since a lot of their mothers did shopping for them in their younger days, many of them just have no clue now and they just look awkward. So let's just get some things clear for them on what women like, what we don't and the importance of having what my friends and I call a good "Pant-Shoe Combo."

First off, all women have different tastes, but I think there's some things we all can agree on...
  1. We all like button ups with the sleeves rolled up. Why? I don't know. But just do it.
  2. We like hair that is soft and/or has movement. Aka no gel, please!
  3. You must smell good. (Shout out to the bf! He always smells fantastic!)
  4. No extreme skinny jeans! Straight kinda skinny ones are okay. (My friend Jake has the best jeans)
  5. ZZ top said it right. We are all crazy for a sharp dressed man. All of us.
Now, us girls have different preferences for what men should wear. For instance, my roommate likes punkier guys that wear like converse and such. Some people like sporty guys. Or preppy guys. Or hipsters. The point is, you should look good regardless. Cause, as much as I hate to say it, we are kinda judgy. Not as bad as guys are to us, but still.

So let's get to the most important thing a guy needs. A great pant-shoe combo. Here's an example of what a bad pant-shoe combo would look like:
Courtesy of rei.com
Now look at this shoe... It's terrible. Yet, I see it all the time! You're not going hiking. You're going to a party... Come on, people!


Courtesy of csneaker.com
Now here's a normal guy's gym shoe. It's not bad. For the gym! Please don't where them out. I think bad shoes are worse then bad jeans. They are way more noticable.


Courtesy of dailymail.co.uk
Fricken baggy pants. Just stop. Guy butt is weird. I dont need to see it. And the shoes are bad too! Just to top it off.

Courtesy of shopunica.com